Contribute to Vega
Designers
When to Contribute to Vega
Have you created a component as part of your designs? It’s a good idea to consider contributing this component so that it may be used again. However, if this component is to be used only once, contribution may not be necessary.
It may be difficult to identify when and if a component should be contributed, so we’ve created this workflow to help you make the decision.
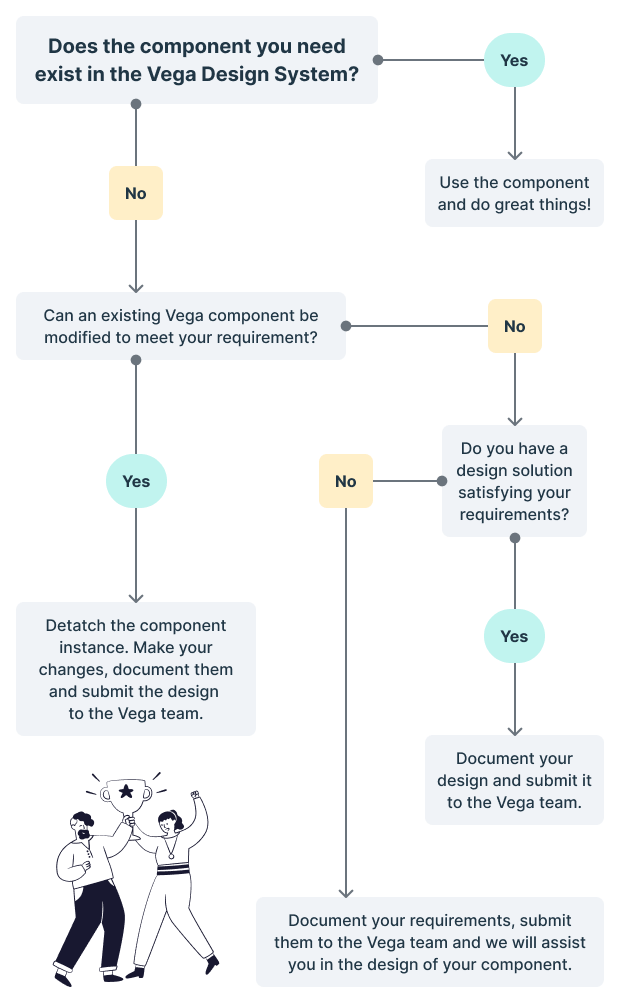

- Does the component you need already exist in Vega?
- Yes - In this situation you should always use the existing component, to help increase scalability of your designs.
- No - Proceed to step 2.
- Can an existing component be modified to meet your requirements?
- Yes - Detach the component instance, make your changes, document them, and submit your design to the Vega team.
- No - Proceed to step 3.
- Do you have a design solution satisfying your requirements?
- Yes - Document your design and submit it to the Vega team.
- No - Document your requirements, submit them to the Vega team, and we will assist you in the design of your component.
How to Contribute to Vega
To contribute a new component to Vega, please reach out to us via our Slack Channel, or through Email at vega@e-hps.com
Basic Guidelines To have a component considered for Vega, we only ask a few things:
Ideally, please design the component using the Vega plugin available in Figma, so as to be able to make best use of existing Vega design tokens to increase scalability and accessibility:
Please provide a sample use-case for this component.
If you need assistance within any of the above, do not hesitate to contact us first for assistance, and we will happily work with you.
Contribute through the Plugin
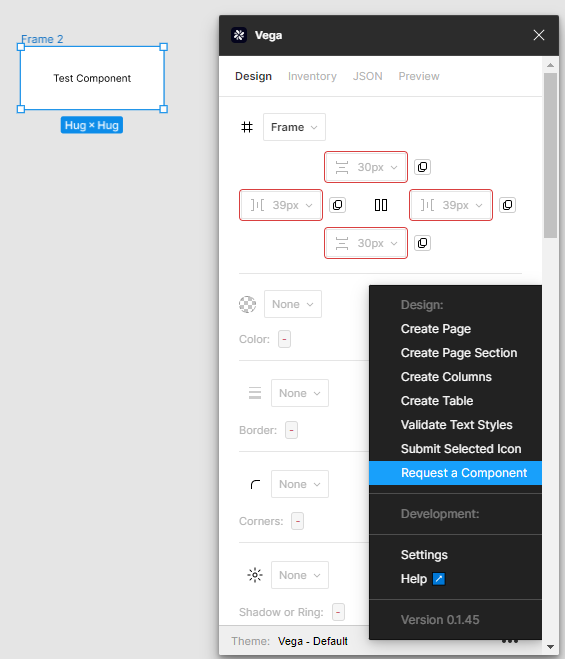
Alternately, functionality now exists for submitting components through the Vega Plugin in Figma. If you have designed a component that you feel is worth submitting into the Vega system, please consider doing so through the Vega plugin.
First select your component, and then click on the three dots at the bottom right of the plugin and select Request a Component.
You will be presented with a form, which will provide you with a preview of your component, a place to name your component.
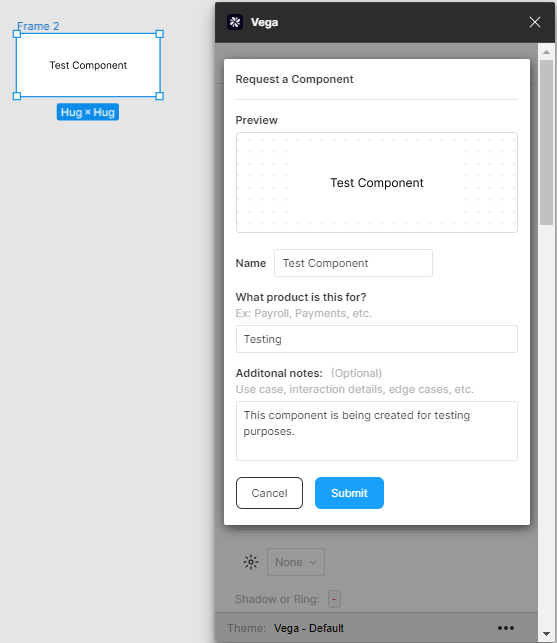
Provide information about which product it is for, and more details, including use case, any variants that may be needed.
Then click Submit.
The Vega team will be provided a notification including full information about your component and will be able to access it.
It is permissible to send incomplete components, as long as information is provided to us via the notes. The Vega team will work with you to make sure that we can provide what it is you need.
Developers
To determine when to submit a component to Vega, developers should follow a similar decision tree as described above under “Designers.”
If you would like to submit code patterns to Vega, it is important to keep in mind that the framework being used is Stencil.js in order to ensure that components created are platform agnostic.
Prerequisites
Before considering a contribution, please follow the procedures on the following list.
- Make sure you have the access to Vega repository and assigned the role Developer in the member list. Please contact us if you are not yet set up.
- Explore the issue queue to make sure there are no existing issues directly related to your submission attempt. If there is, please consider coordinating with the existing issue author.
- Create a new issue in the issue queue Slack channel and describe in detail what you would like to address in your contribution. This can be a bug report or a feature request based on your needs.
- Once your contribution request is approved, you may begin work.
Contribution Process
Before contributing, please follow these steps:
- Familiarize yourself with the Vega Release Cycle.
- Clone the Vega Repository and create a new branch off of
main. - To set up your development environment, follow the development guide. Test and ensure that the project can be built without any issues. If you run into trouble installing Vega locally, please reach out to us.
- Make your desired changes to the Vega source code. Use the development guide to test your changes.
- If you have created code that needs to be tested, please add some tests into your submission, including unit tests and e2e/visual regression/a11y testing.
- If you have changed the public APIs of the Vega components, update the documentation in the associated Storybook files.
- To ensure your code is safe to commit, before committing your files and creating a merge request, follow the instructions for raising a commit.
- Push the changes to your branch.
- Create a Pull Request in the Vega Repository.
- A pipeline will automatically run for your merge request. Please make sure your request has succeeded before reaching out to Vega Developers to review your code.
- Review and address any comments on your merge request.
If all goes well, your request will be merged. If it is not merged, Vega developers will do their best to explain why.
After the change is merged, please feel free to close the Contribution request you creted in the issue queue.
Note: If there is a UI or design that needs to be associated with your component, please be sure to notify us with a copy of the Figma file or any specifications your new component may have. Alternately, you may submit the design using the Vega Figma Plugin.